Friday, October 27, 2006

Mobile Web Best Practices 1.0

456 Berea St (great site!) has a summery of W3C's Mobile Web Best Practices 1.0. It's stupid to summarize the great summary here, but I am doing for my own "notekeeping" sake.

  • Use link target ID
  • No Pop-ups
  • One way scrolling
  • Use of color
  • No frames
  • No table layout
  • Use text alternative for images/image maps/scripts etc.
  • No embedded object
  • Valid markup
  • Label all controls

I've learned them from trial-and-error approach when I was writing separated CSS files for several Nokia devices, but I am glad to find that W3C is working on this documentation.

Someday, I 'd like to work on my own documentation but I suck at writing. I feel like I am such an idiot after spending 1/3 of my life in the US and still struggling with English language. sigh.

Here's some usuful mobile web related links I've bookmarked/del.icio.us'd:

Tuesday, October 17, 2006

Using Google Maps API - Part.4: Info Window

Let's add more functions on the SFO map example.

Opening a Info Window

To create a basic baloon-like floating "info window", call the openInfoWindow(htmlElement) method, passing it a location and a DOM element as an argument to create a text node.

map.openInfoWindow(new GLatLng(37.622934, -122.392159),
                   document.createTextNode("SFO"));

or, use similar method openInfoWindowHtml(htmlString) which takes an HTML string as its argument rather than a DOM element.

map.openInfoWindowHtml(
 new GLatLng(37.622934, -122.392159), "SFO");

Opening a Info Window on Click

Simply calling these methods above just display the info windows upon loading the map. If you want the info window opened by clicking a marker, you need to use event listeners. The static method, GEvent.addListener takes a marker as the 1st argument, the event as the 2nd argument, and a function as the 3rd argument. The events provided by GMap2 Class include; click, infowindowopen and infowindowclose. To open a info window on click, write:

GEvent.addListener(marker, "click", function() {
          marker.openInfoWindowHtml("SFO<br/>CA 94128");
    });

Finally, to give the event to the custom icon previously made, create a new function to combine both displaying the icon and call the click event. The function createMarker takes four arguments, latitude, longitude, icon image URL, and description (html).

In addition to the GIcon properties previously set, define infoWindowAnchor and infoShadowAnchor as well.
var desc_sfo ="SFO - San Francisco Intl Airport<br/>CA 94128";
var marker_sfo = createMarker(37.622934, -122.392159, "icons/sfo.png", desc_sfo);
map.addOverlay(marker_sfo);

function createMarker(lat, lng, ico, html) {
 var point = new GLatLng(lat, lng);
 
 if (ico!=null) {
  var icon = new GIcon();
  icon.image = ico;
  icon.shadow = "http://www.google.com/mapfiles/shadow50.png";
  icon.iconSize = new GSize(26, 44);
  icon.shadowSize = new GSize(50, 44);
  icon.iconAnchor = new GPoint(13, 44);
  icon.infoWindowAnchor = new GPoint(9, 2);
  icon.infoShadowAnchor = new GPoint(18, 25);
 }
 var marker = new GMarker(point, icon);
 GEvent.addListener(marker, 'click', function() {
  marker.openInfoWindowHtml(html);
  });
  return marker;
}

See also: Google Maps API Version 2 Reference

Monday, October 16, 2006

Using Google Maps API - Part.3: Create a Custom Icon

Let's continue on the quick guide of using Google Map API.

Using Custom Icons

The hardest part is creating graphics for your marker image and its shadow with Photoshop or something. The icons should be cretaed in 24-bit png format. For this example, I just tweaked the default icon (the color changed to blue, made it bigger, and typed "SFO" in it!) and used default shadow.

To replace the generic icon to your custom icon, add this code in the last script, before the line that begins with var marker = ...

var icon = new GIcon();
icon.image = "icons/sfo.png";
icon.shadow = "http://www.google.com/mapfiles/shadow50.png";
icon.iconSize = new GSize(26, 44);
icon.shadowSize = new GSize(50, 44);
icon.iconAnchor = new GPoint(13, 44);

First, create a new icon instance (line 1).
Next two lines indicate icon/shadow image source path or URL. (I use default shadow image on Google server).
Next two specifies the image dimention in pixels.
iconAnchor point of the icon is the "pointy" tip where also its shadow image originates. In this case, the anchor point is 13 pixels over and 44 pixels down from the top-left corner of the SFO icon, and this is defined by iconAnchor (line 6).

Location of the marker is defined by GMarker, just as you see in the last example, except, this time you need to add the 2nd paramter to include the custom icon. Finally, call addOverlay() method to dispaly thr marker icon.

var marker = new GMarker(new GLatLng(37.622934, -122.392159), icon);
map.addOverlay(marker);

Next: Opening an Info Window

Thursday, October 12, 2006

Using Google Maps API - Basic Map Part.2 (Source Code)

The entire XHTML code (so far) looks like this:

<!DOCTYPE html PUBLIC "-//W3C//DTD XHTML 1.0 Strict//EN"
  "http://www.w3.org/TR/xhtml1/DTD/xhtml1-strict.dtd">
<html xmlns="http://www.w3.org/1999/xhtml">
  <head>
    <meta http-equiv="content-type" content="text/html; charset=utf-8"/>
    <title>Google Maps JavaScript API Example</title>
    <script src="http://maps.google.com/maps?file=api&v=2&key=YOUR_KEY"
      type="text/javascript"></script>

 <style type="text/css">
  body { font:12px Arial,Verdana,Helvetica,sans-serif;}
  #mapSFO {height: 300px; width: 350px;}
 </style>
  </head>
  <body>
 <!-- No JavaScript Message -->
   <noscript>
 <div class="noscript">
 <b>JavaScript must be enabled in order for you to use Google Maps.</b> <br/><br/>
      It seems JavaScript is either disabled or not supported by your browser. 
      To view Google Maps, please enable JavaScript by changing your browser options, and then 
      try again.
  </div>
    </noscript>
 
 <!-- Map Placeholder -->
 <div id="mapSFO"></div>
 
 <script type="text/javascript">
    //<![CDATA[
 
 var map = new GMap2(document.getElementById("mapSFO"));
 map.setCenter(new GLatLng(37.632934, -122.392159), 12);
 map.addControl(new GLargeMapControl());
 map.addControl(new GMapTypeControl());
 map.addControl(new GScaleControl());
 
 var marker = new GMarker(new GLatLng(37.622934, -122.392159));
 map.addOverlay(marker);
    </script>
  </body>
</html>

See Screenshot of the sample map.

Using Google Maps API - Basic Map Part.1

Here's a quick start guide of using Google Map API.

Before Started

  1. Sign up for the Google Maps API
  2. Copy the generated key
  3. Prepare to write a standards-compliant XHTML page with an appropriateDOCTYPE.

Get Started

Let's create a map indicating San Francisco International Airport (SFO).
First, include Google Maps JavaScript code source and your CSS in <head> section of HTML.

<script src="http://maps.google.com/maps?file=api&v=2&key=COPY_THE_KEY"
      type="text/javascript"></script>

<style type="text/css">
#mapSFO {height: 300px; width: 350px;}
</style>

Next, in <body>, create a placeholder of a map within a <div> with the map ID ("mapSFO").

Then creates a JavaScript GMap2 object to display a map. This GMap2 class represents a single map on the page. The center location of the map is defined in the next line, by latitude and longitude. The second parameter indicates the zoom level. 0 is most zoomed out and 17 is most detailed. (You can find any Latitude and longitude you want from geocoder.us)

<div id="mapSFO"></div>

<script type="text/javascript">
  //<![CDATA[ 
  var map = new GMap2(document.getElementById("mapSFO"));
  map.setCenter(new GLatLng(37.632934, -122.392159), 12);
</script>

View in browser. Now the map of SFO area is displayed.

Adding Controls

Optionally, you can add controls to the map with the addControl method.

  map.addControl(new GLargeMapControl());
  map.addControl(new GMapTypeControl());
  map.addControl(new GScaleControl());

See how the controls are added:

Also try; GSmallMapControl to see how it looks like!

Display a Marker

Displaying map markers is defined by GMarker. This uses the default red Google Maps icon unless specified. In this example, I use GLatLang method to define the location of SFO, since I've set the center of the map slightly off in the beginning. You can use getCenter() method to display a marker at center.
Finally, call addOverlay() method to dispaly thr marker icon.

  var marker = new GMarker(new GLatLng(37.622934, -122.392159));
  map.addOverlay(marker);

This is how it looks like in browser:

See the entire XHTML

OK. I will post the rest later when I have time.
(Next: Using Custom Icons, and Opening an Info Window)

Tuesday, October 10, 2006

Monday, October 09, 2006

Gene Gateway

Thanks to the Human Genome Project, huge volume of the data on human chromosomes and genes residing on them are available freely on Internet.

Gene Gateway is a collection of guides and tutorials designed to to introduce new users to genetic disorder and bioinformatics resources on the Web.
> Download the Gene Gateway PDF here!

Source of this swf file: Human Genome Landmarks Poster: Chromosome Viewer

Also, you can order the free copy of the Human Genome Landmarks: Selected Genes, Traits, and Disorders printed wall poster!

Sunday, October 08, 2006

FashMatch.com - Social Fashion Styling

FashMatch

Fine, match, and get!
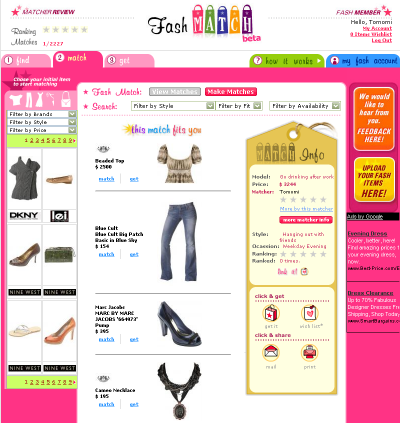
FishMatch is an another brand-new social networking site, specializing for fashion! The site lets you to choose items like tops, bottoms, and shoes, by brand (including Juicy Couture!), style and fit. Once you find great outfit all togeter, you publish the match to public. What makes this site social about is that everybody can view your match and rate it. The screenshot here shows the site UI, with my match - Juicy Couture top and necklace, Blue Cult denim, with Marc Jacobs pumps. You can also purchase the outfit from the site. (The grand total of the style is $3244, by the way!)

Honestly, I love the whole idea about this site but I'd say the UI is not designed really well, and causes pretty bad usability and user experiences. It took me a while to figure out how to work around, and actually spent a long time to create just one match. The each process is painfully slow because the page needs to load each time you make each request. This can be improved if they implement JavaScript/Ajax efficiently. But hey, it is still in Beta! I hope to see some great improvement for next release!

Friday, October 06, 2006

Mobile 2.0 - RSS Feeds for Mobile

Nokia has announced the launch of WidSets is a mobile widget platform available for Java MIDP 2.0 phones and is manufacturer and browser independent (that works non-Nokia phones too). Like widgets on a computer, you can access to information from RSS feeds (news, blogs, flickr, etc). This is like for the mobile what Netvibes is for the browser. Cool.

O'Reilly Reader: Mobile 2.0 Nokia Launches WidSets

Rounded Corner with Images - Create a Nav Bar

This is another example of round-corner in CSS, but this one requires images. The figure 1 is a screenshot of the actual horizontal nav bar I created a while ago.

screenshot
Figure 1.

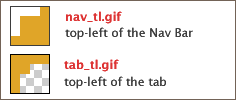
For this nav bar, I created 4 images - Top-left and top-right for the nav bar, and top-left and top-right corner for tabs. All images are created in 4 pixel by 4 pixel dimension. The figure 2 show the top-left of nav bar, and top-left of tabs.

gif examples
Figure 2.

The nav_tl.gif (nav) has orange round corners, while tab_tl.gif (tab) has orange background with transparent corners, because I wanted to create a "selected" tab and mouse-over color-change effect only with CSS color change, without using extra images.

The code below is the HTML part of the nav bar. I assign the background-image to <a> tag for top-left corner gif, and I gave nonsense tag, <span> to apply the top-right corner gif as background image.


HTML (Navbar using unordered lists)
<div id="navBar">
 <ul>
  <li><a href="#" class="selected"><span>Home</span></a></li>
  <li><a href="#"><span>Blog</span></a></li>
  <li><a href="#"><span>Extras</span></a></li>
 </ul>
</div>

Tabs with Round-Corners
/* Top-left corner */
#navBar a { 
 background: url("images/tab_tl.gif") no-repeat top left;  
}
/* Top-right corner */
#navBar a span { 
 background: url("images/tab_tr.gif") right top no-repeat;
}
/* Hover-state ("Blog" tab in Figure 1) */
#navBar a:hover {
 background-color: #F9CA66; 
}
/* Selected Tab ("Home" tab in Figure 1) */
#navBar a.selected, #navBar a.selected:hover {
 color: #750;
 background-color: #fff;
}

The entire CSS for the nav bar looks like this:

CSS (All)
 #navBar {
  font-family: "Trebuchet MS", Helvetica, sans-serif;
  font-size: 18px;
  width: 270px; 
  color: #fff;
  background: #e0a528 url("images/nav_tl.gif") no-repeat top left; 
  position: relative;
 }
 #navBar ul {
  white-space: nowrap;
  padding: 10px 15px 0;
  margin: 0;
  background: url("images/nav_tr.gif") no-repeat top right;  
  overflow: hidden;
 }
 #navBar li {
  display: inline; 
  list-style-type: none; 
 }
 #navBar a { 
  color: #fff;
  text-decoration: none;
  padding-left: 10px;
  margin: 0 3px;
  background: url("images/tab_tl.gif") no-repeat top left;  
 }
 #navBar a span { 
  background: url("images/tab_tr.gif") right top no-repeat;
  padding-right: 10px;
 }
 
 #navBar a:hover {
  background-color: #F9CA66; 
 }
 #navBar a.selected, #navBar a.selected:hover {
  color: #750;
  background-color: #fff;
 }

Thursday, October 05, 2006

Quick and Dirty CSS Round-Corner

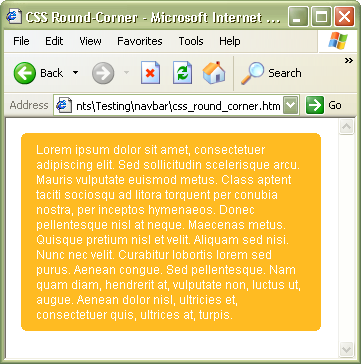
Another way to create CSS rounded corners without images. When using -moz-border-radius is not an option, this is a quick and easy solution that works with IE 6+ .

A quick way to create round-corners without using any images

Use an inline element such as <b> that acts like pixels.

The reasons for using <b> tags:
because it doesn't have semantical meaning, and can be nested in any tags.

CSS:
.box {
  background: #fb2;
  color: #fff; 
}
.box p {margin: 5px 15px;}
.rTop, .rBottom {
  display:block;
  background:#fff;
}
.r1, .r2, .r3 {
  display: block;
  height: 1px;
  overflow: hidden;
  background:#fb2;
} 
.r1 {margin: 0 4px}
.r2 {margin: 0 2px}
.r3 {margin: 0 1px; height: 2px}

round-top diagram
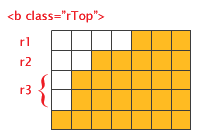
"Magnified view" of the rows (r1 thru r3) that act as pixels. For larger corner radius, increase the numbers of the rows and modify the margins and height on each row.

HTML:
<div class="box">
  <b class="rTop">
    <b class="r1"></b> <b class="r2"></b> <b class="r3"></b> 
  </b>
    <p>content here</p>
  <b class="rBottom"> 
    <b class="r3"></b> <b class="r2"></b> <b class="r1"></b>
  </b>
</div>
screen shot

Wednesday, October 04, 2006

Rounded Corners for Mozilla/Firefox

In Mozilla, -moz-border-radius can be used to give borders rounded corners. This is one of the proposals leading to the proposed CSS 3 border-radius property.

Syntax:
-moz-border-radius: <border-radius>{1,4} | inherit

Example
.box {
  background-color: #fb2;
  border: 1px solid #000;
  -moz-border-radius: 7px;
  -webkit-border-radius: 7px; /* for WebKit */
  padding: 15px;
}

Individual corners
The border-radius can be specified individually for each corner

  border-top-right-radius
  border-bottom-right-radius
  border-bottom-left-radius
  border-top-left-radius

http://developer.mozilla.org/en/docs/CSS:-moz-border-radius